

Half-Moon manicures are becoming quite a rage these days, thanks partly to many celebrities who seem to rock them at every other social do. And although it looks pretty complicated, this particular nail trend can be easily achieved at home. All you need is a few basic steps to follow and the patience to recreate the look.
What is a Half-Moon Manicure anyway?
So what is it about a half-moon manicure that has everyone going gaga over it? For starters, a half – moon manicure is different from the traditional French manicures that we are so used to seeing.
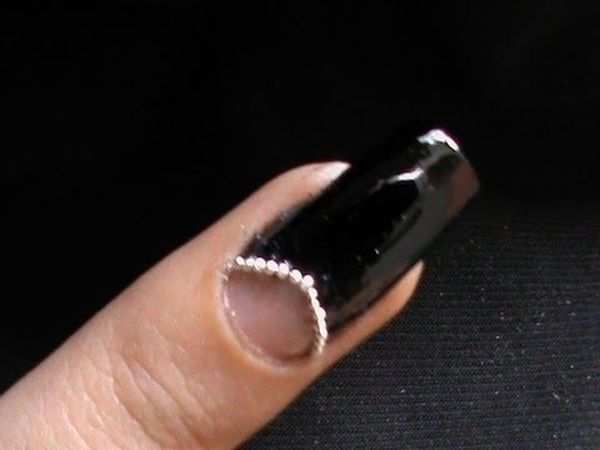
While a French manicure would show the tips of the nails in a different color, a half-moon manicure would have a different color on the moon of the nail. And in contrast to French manicures which usually feature dark colored tips, a half-moon manicure would usually feature a lighter color on the moon.
So how do you go about getting a half-moon manicure at home? Simple, follow the instructions given below.
Things you would need:
- Clear Base Coat Polish
- Different colored nail polishes : 2 No.
- Reinforcement Stickers : 10 No.
- Clear Top Coat Polish
Note: Always choose contrasting nail polish colors as this would make the half-moon stand out. An excellent example would be black or navy blue with white.
Choose good quality reinforcements stickers, preferably ones that have holes punched in them for ease of use.
The Method
- Make sure your nails are clean and trimmed beforehand. If not, clean them immediately and file them properly before starting the manicure.
- Use a clear base coat to cover the entire nail first. Now apply at least 2 coats of the base polish, i.e. the color you want for the bottom (for instance, white).
- Make sure you cover the entire nail bed with the base color (white in this case). Allow it to dry completely for at least half an hour.
- Cut the reinforcement stickers to resemble tiny half-moons (resembling the moon of the nail). Make sure that you stick to a uniform shape and size in order to get a consistent look across all the nails.
- Carefully place the cut out reinforcement stickers on the nails, one sticker each for the moon of a nail. Once you have placed all the stickers in place, apply some pressure on them to ensure that they don’t move later.
Note: Always make sure that the base polish has dried completely before placing the stickers. If the base polish is still wet, chances are that the stickers would peel of the polish, forcing you to start the manicure all over again.
- Wait for a few minutes for the stickers to get secured to the nails. Now apply at least 2 coats of the top color (the color you want for the remaining top half of the nail, including the nail tips).
- Make sure you cover the top half of the nail completely with the top color (in this case, black). The base polish should not be visible anywhere on the top half. Let the polish dry for at least 45 minutes.
- Once the top color has dried completely, carefully remove the reinforcement stickers from the nails, making sure you don’t smudge the polish in between.
- Use a clear top coat polish to lock the colors in place. Allow it to dry for at least 30 minutes. And Hey Presto! There’s your half-moon manicure!